

Print - Scan - Copier - Fax
Access to the copiers and printers is provided for faculty, staff, and students who are tenants of Kelly Hall/ICTAS II/NCFL (our facilities)
Equipment
Ricoh Copiers with the following features:
- Black and white printing/copying
- Faxing (on select copiers)
- Scan to email or flash-dirve as pdf
- Duplex printing/copying (front and back)
- Stapling
Access Code
The access code is required to print and use the copier. Access codes are provided to each group or lab, with all the members of that group sharing the same code. Access codes only work on the specific floor a group is located in.
If you need your group's access code send a message with your PI or group name to ictasit@vt.edu
Copier
- Tap "Copier (Classic)" icon
- Enter the Access Code using the number keypad on the right hand side and tap "OK"
- Load your document into the document feeder on top or lift the lid and place your document on the glass
- Tap "Start"
Scan to Email
- Tap "Scanner(Classic)" icon - If the Scanner icon is not at the first screen swipe right to left on the display
- Tap on "Email" tab
- Tap on "Manual Entry", enter the email address to send it to, and tap "OK"
- Load your document into the document feeder on top or lift the lid and place your document on the glass
- Tap "Start"

Fax
- Tap "Fax (Classic) - If the Fax icon is not at the first screen swipe right to left on the display -
- Using the number keypad, enter the fax number (Prefix 9 for off campus, followed by a 1 if long distance)
- Load your document into the document feeder on top or lift the lid and place your document on the glass
- Tap "Start"
Fax numbers
| Building/Floor | Fax Number |
|---|---|
| Kelly Hall - Fourth Floor |
(540) 231-2953 |
| ICTAS II - Second Floor |
(540) 231-6189 |
| NCFL - Second Floor |
(540) 231-1963 |
Print - Windows
To connect to a Printer/Copier with Windows 10 machine:
- Open a File Explorer window -- NOT Google Chrome or Firefox browser -- see a picture below
- Type in the address bar \\pod3.cntrlsrvs.w2k.vt.edu and press enter. This is a hyperlink. It will not open in your web browser.
- If prompted for a user name and password
- Name: Pod3\bob
- Password: Printer123!
- Put a check the remember password box

- Double click the printer you want to add
- Next to the Start button click on the magnifier glass and type Printers
- Select Printers & scanners
- Select the printer you added
- Click on Manage
- Select Printing preference
- Click "Detailed Settings" tab at the top
- Click on "Basic" on the Menu column
- Select "Black and White"
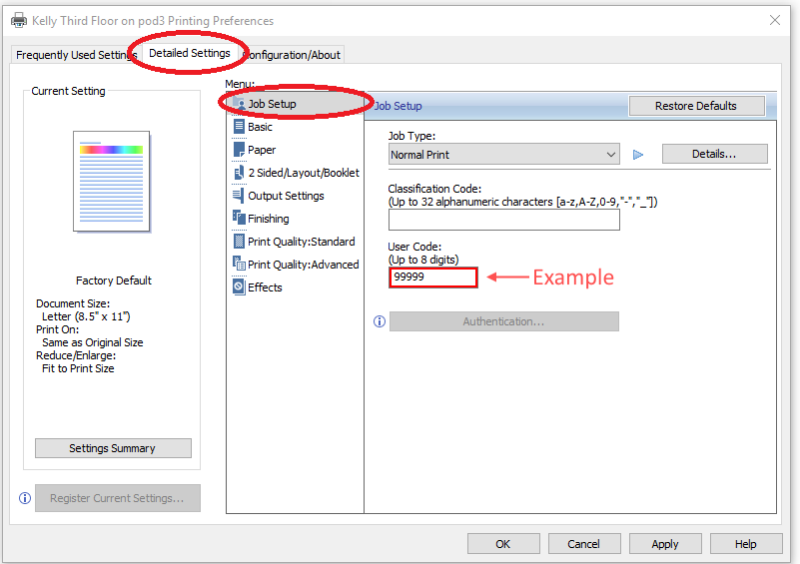
- Click on "Job Setup" from the Menu column
- Type the Access Code in the "User Code" box (currently showing 99999)
- Click OK
- You are now ready to print
Filename: Ricoh_IM_C3010_C3510_C4510_LIO_1.2.0.0.dmg
File Size: 4.30 MB
File Description: Download Ricoh driver for Mac
- Select System Settings from the Apple menu
- Look for the option Printers & Scanners
- Select Printers & Scanners to open the settings pane.
- Select the Add Printer,Scanner, or Fax… button
- Check that you have the Advanced icon "gears" in the Add Printer toolbar. If not, it can be added by right clicking or press the "Control" key on the toolbar and selecting Customize Toolbar .
- Drag the Advanced icon "gears" onto the toolbar
- Click the Advanced icon that was added to the toolbar

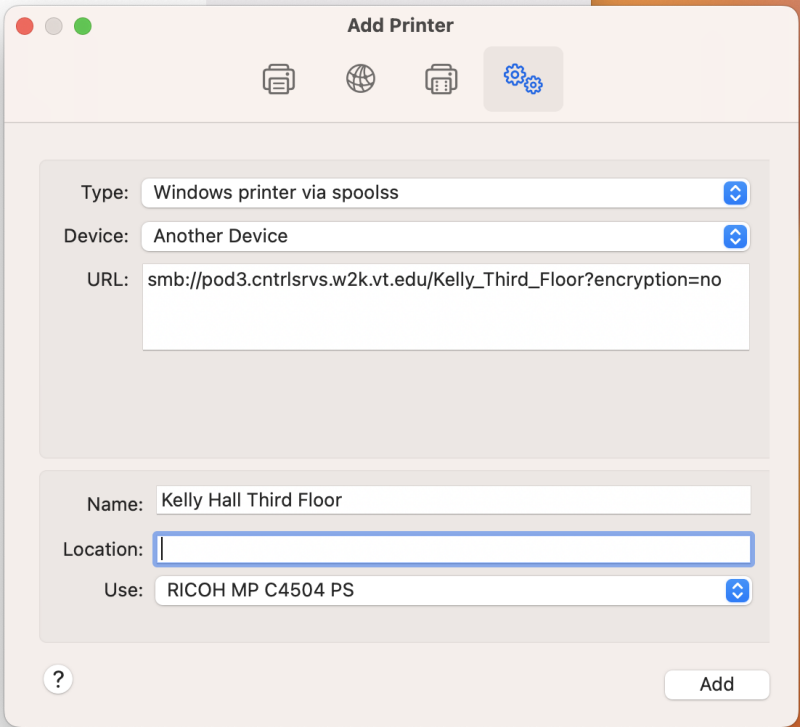
- Choose Windows printer via spoolss from the Type pop-up menu
- In the URL field, type the printer's address in one of the following formats:
| Building/Floor | Copier Model | Copier Network Location (Printer's Address) |
|---|---|---|
| Kelly Hall First Floor | Ricoh MP C306Z | smb://pod3.cntrlsrvs.w2k.vt.edu/Kelly_First_Floor?encryption=no |
| Kelly Hall Second Floor | Ricoh MP IM C3010 | smb://pod3.cntrlsrvs.w2k.vt.edu/Kelly_Second_Floor?encryption=no |
| Kelly Hall Third Floor | Ricoh MP IM C3010 | smb://pod3.cntrlsrvs.w2k.vt.edu/Kelly_Third_Floor?encryption=no |
| Kelly Hall Fourth Floor | Ricoh MP IM C3010 | smb://pod3.cntrlsrvs.w2k.vt.edu/Kelly_Fourth_Floor?encryption=no |
| ICTAS II First Floor | Ricoh MP C306Z | smb://pod3.cntrlsrvs.w2k.vt.edu/ICTASII_First?encryption=no |
| ICTAS II MII Suite | Ricoh MP C4504ex | smb://pod3.cntrlsrvs.w2k.vt.edu/ICTASII_MII?encryption=no |
| ICTAS II Second Floor | Ricoh MP C4504 | smb://pod3.cntrlsrvs.w2k.vt.edu/ICTASII_Second?encryption=no |
| ICTAS II Third Floor | Ricoh MP C4504 | smb://pod3.cntrlsrvs.w2k.vt.edu/ICTASII_Third?encryption=no |
| NCFL Second Floor | Ricoh MP C306Z | smb://pod3.cntrlsrvs.w2k.vt.edu/NCFL_Second?encryption=no |
| DronePark | Ricoh MP C307 | smb://pod3.cntrlsrvs.w2k.vt.edu/DronePark?encryption=no |
- In the Name field, type the name for this printer
- Click the Use box and then click on Select Software
- Choose the Ricoh IM C3010 PS printer driver from the list (Even if you have a different model)
- Click Add
- Open Microsoft Word
- Create a new document
- Type Test in the document
- Click File
- Click Print
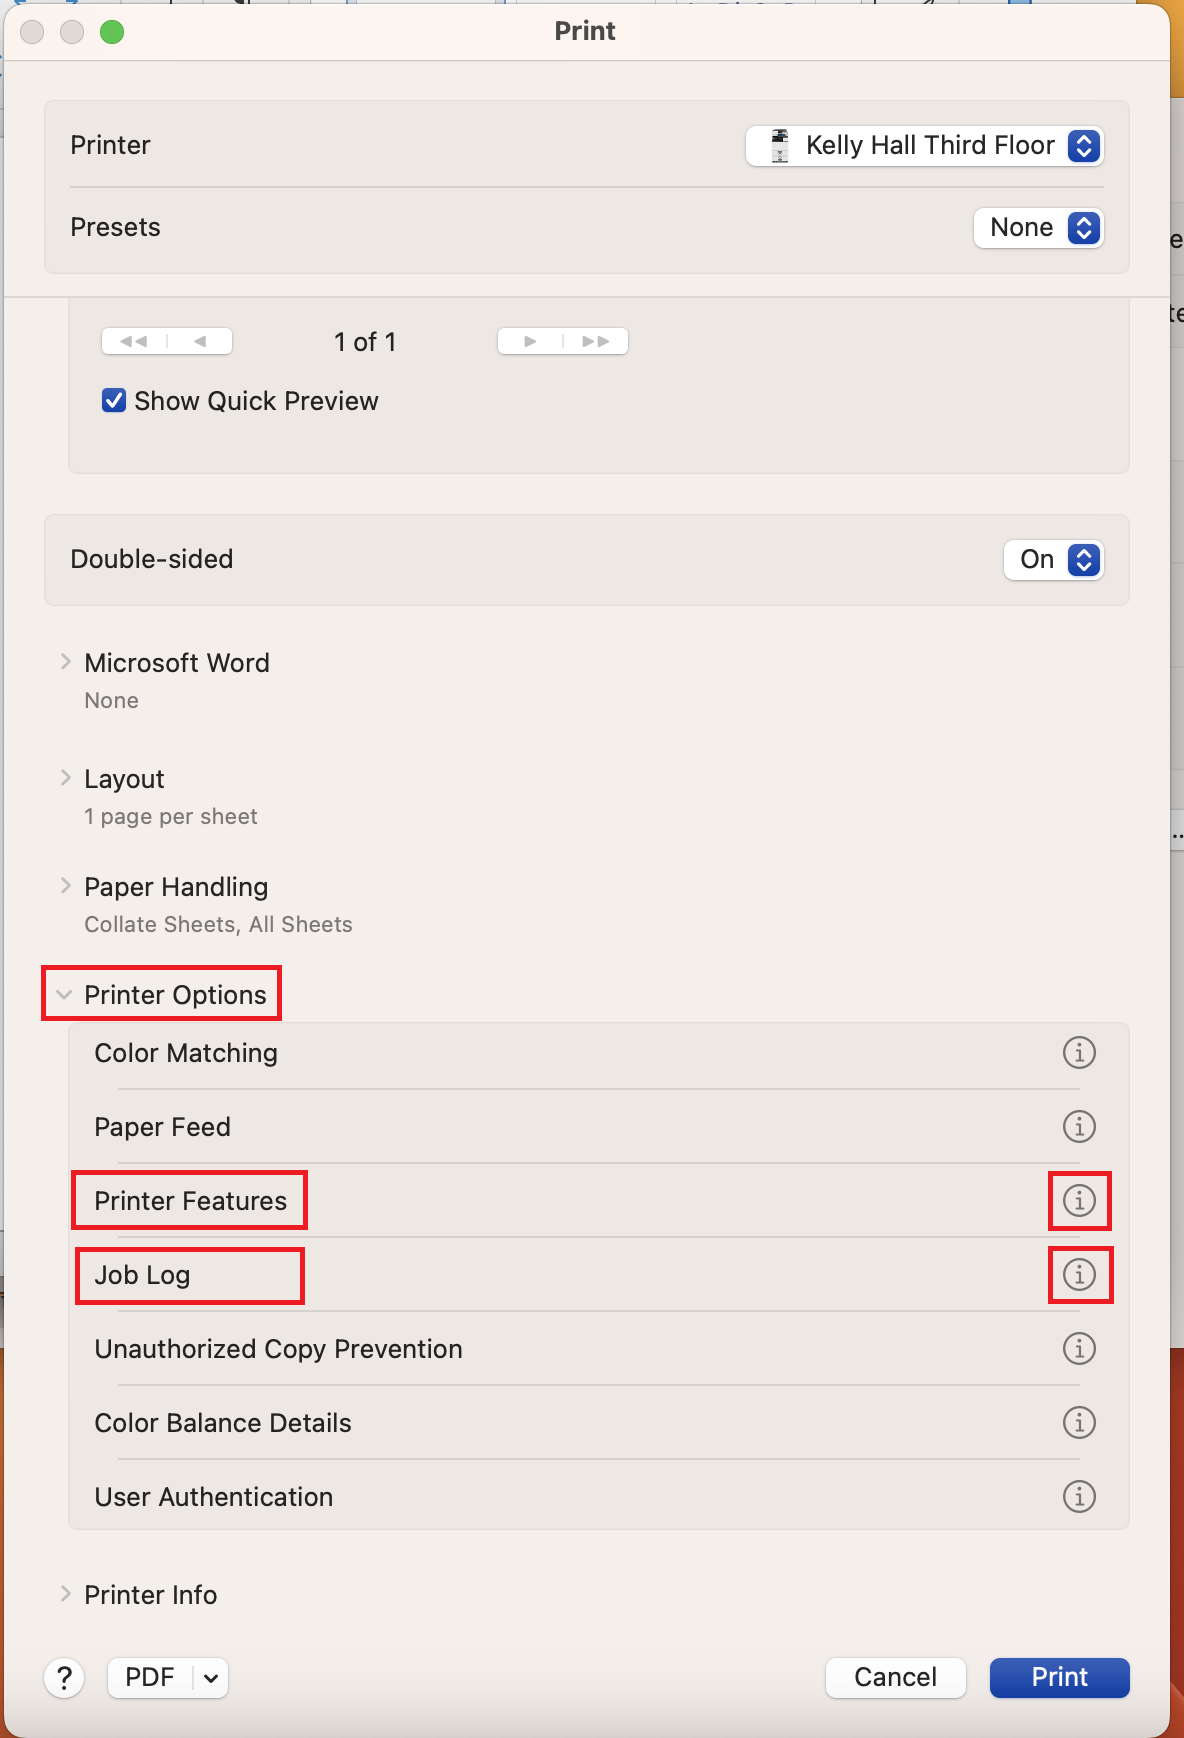
- Make sure that you select the printer you just added . For this example is Kelly Hall Third Floor
- Select Printer
- Select Printer Options
- For Printer Features click on the "i"
- Change the Color Mode to "Black and White"
- For Job Log click on the "i"
- Place a check in the box that says "Enable User Code"
- Enter Access Code in User Code:
- For "Presets" and click on "Save Current Settings as Preset…"
- In the "Preset Name" enter the name of the printer for this example is Kelly Hall Third Floor
- Click OK
- Click Print
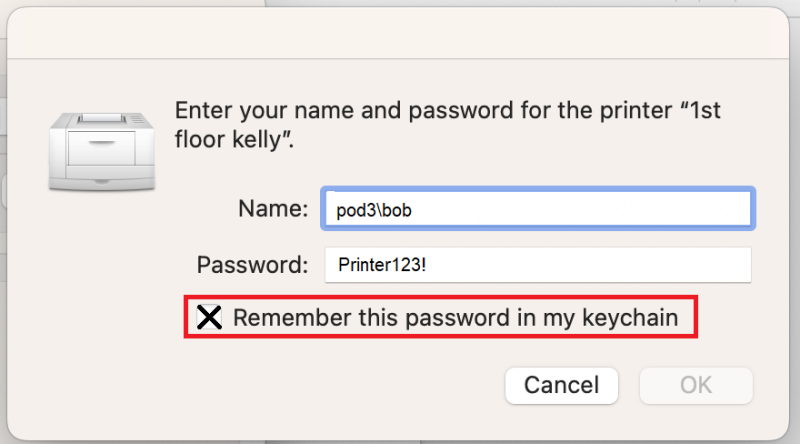
- A box will pop up asking you to enter your name and password.
- Name: pod3\bob
- Password: Printer123!
- Check in the box "Remember this password in my keychain"
- Click OK
- Your test page should now print. You are now ready to print.
To add the feature Finisher staple for the mac:
- Select System Settings from the Apple menu
- Select Printers & Scanners
- Select the printer
- Click on "Options & Supplies"
- Click on "Options"
- For "Finisher" Select "Finisher SR3210"
- Click on OK

In Microsoft Word:
- Click File
- Click Print
- Make sure that you select the printer you just added . For this example is Kelly Hall 2nd
- Select Printer
- Select Printer Options
- For Printer Features click on the "i"
- For Feature Sets: select "Finishing"
- For Staple: from the drop down menu select the option you want to be staple

To print directly from a USB flash drive, you need:
- An Access Code
- The document must be a PDF file
- Tap "Print/Scan (Memory Storage Device)" icon - If the USB flash drive icon is not at the first screen swipe right to left on the display
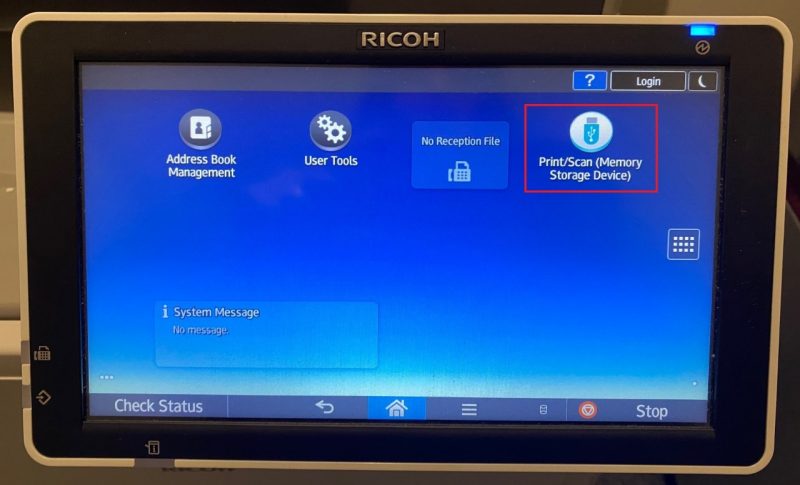
- Tap “Print from Storage Device”
- Insert your USB flash drive at the left side of the screen
- Tap and select file
- Tap on "Print Settings"
- Tap on "Full Color"
- Select "Black & White"
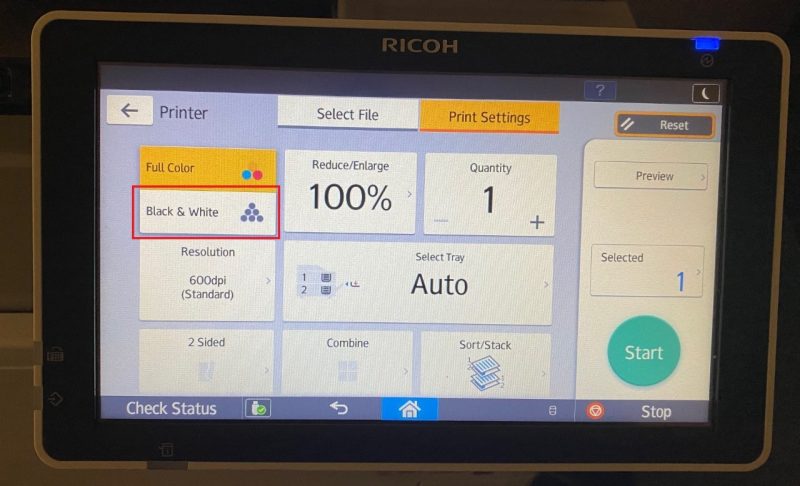
- Tap on "Start"
- Enter the User Code (Access Code)
- Tap on "OK"
- To remove the USB drive
- Tap on the USB icon, on the bottom left corner, and tap on "OK"
- Remove your USB drive

- Choose System Preferences from the Apple menu
- Choose Print & Fax from the View menu
- Click the "+" button to add a printer
- Press the Control key while clicking the "Default" icon (or any other icon on the toolbar), then choose Customize Toolbar from the contextual menu that appears.
- Drag the Advanced (gear) icon up to the toolbar
- Click Done
- Click the Advanced icon that was added to the toolbar
- Choose "Windows printer via spoolss" from the Type pop-up menu
- In the URL field, type the printer's address in one of the following formats:
| Building/Floor | Copier Model | Copier Network Location (Printer's Address) |
|---|---|---|
| Kelly Hall First Floor | Ricoh MP C306Z | smb://pod3.cntrlsrvs.w2k.vt.edu/Kelly_First_Floor?encryption=no |
| Kelly Hall Second Floor | Ricoh MP C4504 | smb://pod3.cntrlsrvs.w2k.vt.edu/Kelly_Second_Floor?encryption=no |
| Kelly Hall Third Floor | Ricoh MP C4504 | smb://pod3.cntrlsrvs.w2k.vt.edu/Kelly_Third_Floor?encryption=no |
| Kelly Hall Fourth Floor | Ricoh MP C4504 | smb://pod3.cntrlsrvs.w2k.vt.edu/Kelly_Fourth_Floor?encryption=no |
| ICTAS II First Floor | Ricoh MP C306Z | smb://pod3.cntrlsrvs.w2k.vt.edu/ICTASII_First?encryption=no |
| ICTAS II MII Suite | Ricoh MP C4504ex | smb://pod3.cntrlsrvs.w2k.vt.edu/ICTASII_MII?encryption=no |
| ICTAS II Second Floor | Ricoh MP C4504 | smb://pod3.cntrlsrvs.w2k.vt.edu/ICTASII_Second?encryption=no |
| ICTAS II Third Floor | Ricoh MP C4504 | smb://pod3.cntrlsrvs.w2k.vt.edu/ICTASII_Third?encryption=no |
| NCFL Second Floor | Ricoh MP C306Z | smb://pod3.cntrlsrvs.w2k.vt.edu/NCFL_Second?encryption=no |
| DronePark | Ricoh MP C307 | smb://pod3.cntrlsrvs.w2k.vt.edu/DronePark?encryption=no |